Keeping an orchid blooming isn’t about following rigid rules; it’s about understanding its botanical logic to avoid common, fatal mistakes like the ice cube trick.
- Transparent pots are not just for aesthetics; they are critical for fueling root photosynthesis and preventing suffocation.
- Strategic temperature drops and precise spike pruning, not constant warmth or random cutting, are the true triggers for a new bloom cycle.
Recommendation: Begin by observing your orchid’s root color and potting medium moisture daily, letting the plant—not the calendar—tell you when it needs care.
The initial allure of an orchid is undeniable. Its sculptural form and exquisite flowers bring a touch of living art to any modern home. Yet, for many, this initial delight fades into a familiar cycle of disappointment: the magnificent bloom withers, leaving a lonely spike and a sense of failure. You’ve likely heard the standard advice—water it sparingly, provide indirect light—but these generalities often lead to more questions than answers, and rarely, a second bloom. The internet is filled with conflicting information, from the pervasive ice cube myth to vague instructions on cutting back the plant.
The frustration is understandable, but the solution isn’t to find a « secret trick. » It’s to fundamentally shift your perspective from that of a plant owner to a cultivator who understands the plant’s core needs. The key to sustained blooming and a healthy orchid doesn’t lie in a rigid schedule, but in decoding the botanical logic of this unique epiphyte. An orchid in a pot is a carefully managed micro-environment, and mastering it requires understanding why it needs what it needs, from its roots to its flowers.
This guide moves beyond the platitudes. We will dissect the science behind orchid care, explaining the ‘why’ behind each action. You will learn to read your plant’s signals, manage its energy budget for flowering, and even use deliberate, controlled stress to your advantage. By the end, you will not only know how to keep your orchid alive but how to make it thrive, transforming it from a fleeting decoration into a permanent, re-blooming fixture of your home’s design.
To guide you on this journey from novice to confident cultivator, we will explore the essential pillars of orchid mastery. This structured approach will cover everything from the foundational role of the pot to the advanced techniques for triggering new blooms and integrating your plant into a larger decorative scheme.
Table of Contents: A Grower’s Guide to Long-Lasting Orchid Blooms
- Why Do Transparent Pots Make Orchids Healthier and Stronger?
- How to Stake an Orchid Spike Without It Looking Artificial?
- Moth Orchid or Cane Orchid: Which Is Easier for Novice Owners?
- The Ice Cube Myth That Shocks Orchid Roots to Death
- When to Cut the Spike to Trigger a Second Bloom Cycle?
- How to Use Orchids to Symbolize Strength and Longevity for Elders?
- How to Choose Structure Plants That Complement Modern Furniture?
- How to Create a Potted Plant Jungle on a Concrete Terrace?
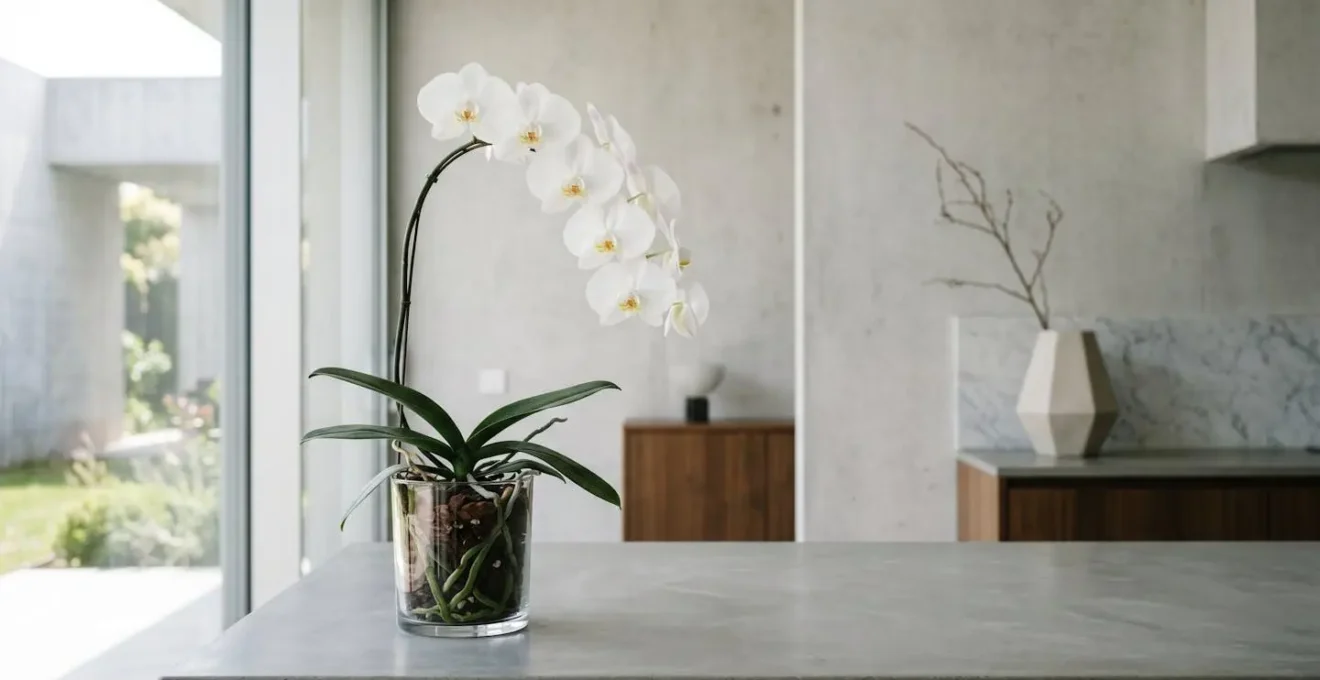
Why Do Transparent Pots Make Orchids Healthier and Stronger?
The first step in rethinking orchid care begins at the very foundation: the roots. In the wild, most commercially available orchids, like the popular Phalaenopsis, are epiphytes. They don’t grow in soil but cling to trees, their roots exposed to air and light. This evolutionary history is the key to understanding why transparent pots are not merely a modern design choice but a critical tool for plant health. Unlike terrestrial plants, an orchid’s thick, silvery-green roots are photosynthetic. They are, in effect, a secondary set of leaves.
This isn’t just a theory; it’s a measurable biological function. As recent research from 2024 demonstrates, Phalaenopsis roots actively produce oxygen when exposed to light, which is vital for preventing the suffocating, low-oxygen conditions (hypoxia) that develop in the dark, dense environment of an opaque pot. A clear pot allows you to mimic the orchid’s natural habitat, enabling the roots to perform photosynthesis, thus creating their own oxygen and bolstering the plant’s overall energy budget. This simple choice directly contributes to a stronger, more resilient plant, better equipped to produce and sustain long-lasting blooms.
Cultivation of orchids in transparent pots is thus not only effective in preventing roots to grow outside the pot, which are more attractive for ornamental plants, but also allows proper root photosynthetic oxygen production.
– Research team at Sant’Anna School of Advanced Studies, Functional Plant Biology
Furthermore, a transparent pot is an invaluable diagnostic tool for the grower. It offers a clear window into the plant’s two most critical health indicators: root vitality and moisture level. You can instantly see if the roots are a healthy, vibrant green (well-hydrated) or a silvery-white (time to water). You can also spot signs of trouble, like black, mushy roots from overwatering, far sooner than you could in a ceramic pot. This visual feedback empowers you to water based on the plant’s actual needs, not a generic weekly schedule.
How to Stake an Orchid Spike Without It Looking Artificial?
Once your orchid is thriving in its transparent home, the next challenge is managing its elegant flower spike. A healthy Phalaenopsis can produce a long, arching spray of flowers that, while beautiful, often requires support to prevent it from drooping or snapping. However, the standard green stake and bulky clips provided by many retailers can disrupt the clean lines of a modern interior, making the plant look more clinical than natural. The goal is aesthetic integration: providing necessary support in a way that is either invisible or a deliberate, beautiful part of the composition.
The secret lies in choosing materials that complement the plant and your decor, and in applying them with a minimalist touch. Forget the idea that staking has to be purely functional. It can be an artistic expression. For a sleek, modern look, a thin acrylic rod can all but disappear, letting the orchid’s form take center stage. For a warmer, more organic or biophilic aesthetic, natural materials like bamboo or curly willow add texture and interest. The key is to secure the spike loosely with fine wire or clear micro-clips, allowing it some natural movement.
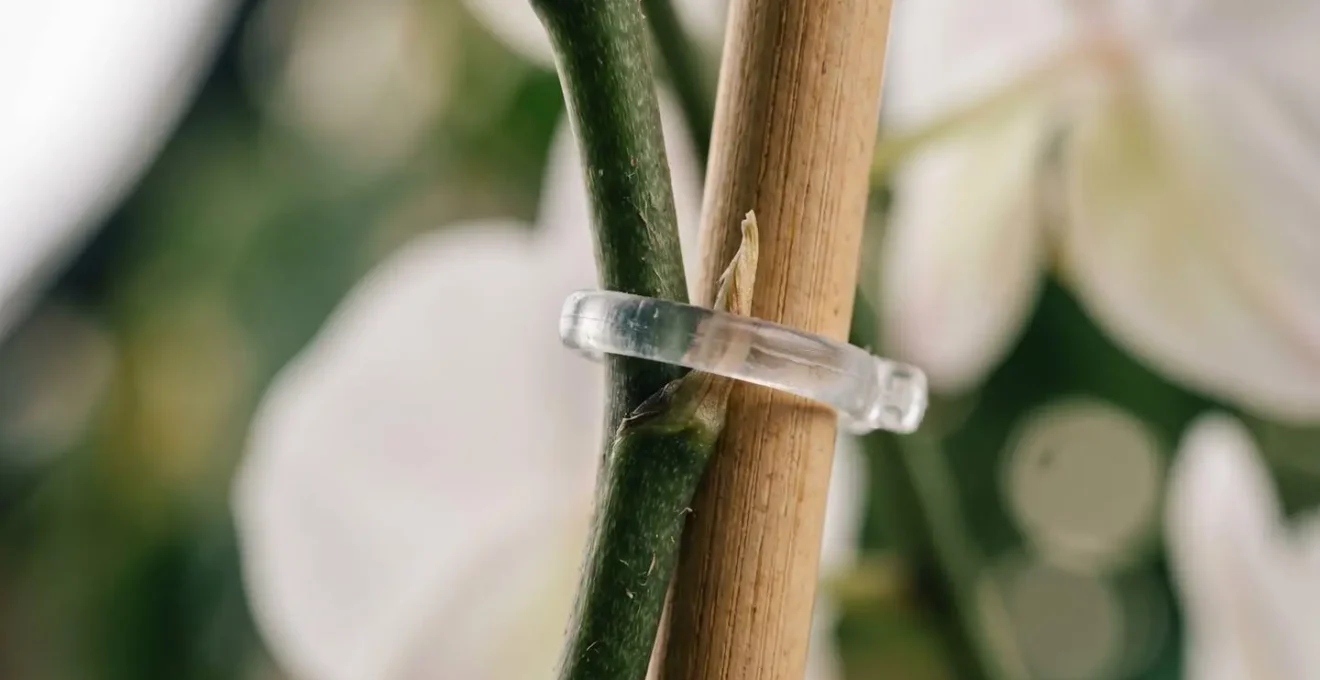
The technique is as important as the material. The support should be inserted carefully into the potting medium, avoiding damage to the root system. The spike should be attached at several points as it grows, gently guiding its direction. Don’t try to force a hardened spike into an unnatural position; it’s better to stake it early when it is still pliable. In some cases, if a spike has grown strong and upright on its own, the most elegant solution is to leave it unstaked, celebrating its natural strength and form. This minimalist approach embodies the confidence of an experienced grower who prioritizes the plant’s organic beauty.
Moth Orchid or Cane Orchid: Which Is Easier for Novice Owners?
Before diving deeper into advanced care, it’s crucial to ensure you’re working with the right plant. While there are thousands of orchid species, the two most common types available to home growers are Phalaenopsis (Moth Orchids) and Dendrobium (Cane Orchids). Though they may look similar on a store shelf, their growth habits and care requirements differ significantly. For a novice owner aiming for a low-maintenance, reliable bloomer, the choice is clear: the Phalaenopsis is unequivocally easier and more forgiving.
The primary reason for this is the Phalaenopsis’s adaptability to typical indoor environments. It thrives in the same moderate, indirect light and stable temperatures that are comfortable for humans. Its monopodial growth habit (growing from a single stem) makes it compact and predictable. In contrast, Dendrobiums are often more demanding. They typically require brighter light and, crucially, a distinct « rest period » with cooler temperatures and reduced watering to trigger their next bloom cycle. Failing to provide this specific environmental cue is the most common reason why a beginner’s Dendrobium fails to re-flower.
Phalaenopsis thrives in conditions similar to African violets—a useful benchmark for anyone who has successfully kept other houseplants alive.
– University of Maryland Extension, Orchid care guidelines for home growers
This following comparison highlights why the Phalaenopsis is the ideal starting point for anyone seeking to build their confidence. It offers a much longer bloom duration and has more tolerant light and temperature requirements, making success far more attainable for those just beginning their journey as orchid cultivators.
| Characteristic | Phalaenopsis (Moth Orchid) | Dendrobium (Cane Orchid) |
|---|---|---|
| Bloom Duration | Up to 3 months | Up to 6 weeks |
| Light Requirements | Bright, indirect light; tolerates lower light | Brighter light; can tolerate more direct sunlight |
| Temperature Range | Warm (18-26°C / 64-79°F) | 60-80°F (16-27°C); needs cooler night temps to bloom |
| Humidity Needs | 40-60% relative humidity | 40-60% relative humidity |
| Growth Habit | Monopodial (single stem); compact | Sympodial (multiple canes); upright, vertical structure |
| Beginner-Friendly | Highly recommended; easiest orchid for beginners | Moderate; requires specific rest period for reblooming |
The Ice Cube Myth That Shocks Orchid Roots to Death
Of all the pieces of orchid advice, few are as widespread, convenient, and dangerously wrong as the « just add ice » method. The marketing is brilliant: a simple, no-spill way to water a notoriously finicky plant. However, this practice ignores the most fundamental fact about common orchids like Phalaenopsis: they are tropical plants. They have evolved over millennia in warm, humid climates, and their physiology is simply not equipped to handle freezing temperatures delivered directly to their most sensitive organ—the root system.
Watering with ice cubes doesn’t just provide cold water; it creates a prolonged point of intense cold that can cause significant cellular damage. As an analysis of the ice cube watering method explains, this practice is a form of shock to the plant. The roots’ outer layer, a spongy tissue called velamen, is designed to rapidly absorb ambient moisture. When hit with ice-cold water, its cells can be damaged, impairing their ability to absorb water and nutrients in the future. It’s a slow death by a thousand cuts, often leading to root rot and a decline in the plant’s overall health, which the owner then misattributes to other causes.
Cold shock is a real concern. Orchid roots are sensitive, and ice-cold water can damage the cells in the velamen, the spongy tissue that absorbs water and nutrients.
– Botany Breakdown, Analysis of ice cube orchid watering method
The correct way to water an orchid is to mimic a gentle tropical rain. Use room-temperature water and thoroughly flush the potting medium until water runs freely from the drainage holes. This not only hydrates the roots but also flushes out accumulated salts from fertilizers. Then, and this is critical, allow the plant to drain completely. The goal is a cycle of drenching and drying out. Wait until the potting medium is nearly dry and the roots inside the pot have turned from green to a silvery-white before watering again. This method respects the plant’s botanical logic, providing the hydration it needs without the damaging shock of ice.
When to Cut the Spike to Trigger a Second Bloom Cycle?
After weeks or months of enjoying the flowers, the inevitable happens: the last bloom fades and falls. This is a critical moment in the orchid’s life and a point of confusion for many owners. What you do next will determine whether the plant puts its energy into growing new leaves and roots or attempts a second flowering. For the Phalaenopsis orchid, and only the Phalaenopsis, you have a strategic choice, as it is the only common orchid that can rebloom from its old spike.
The decision depends on the condition of the spike. If the spike is still green and firm, you have the opportunity to encourage a secondary bloom. To do this, locate the small, triangular bumps along the stem, which are the nodes. By cutting the spike about an inch above a healthy-looking node, you can often stimulate the plant to send out a new branch of flowers from that point. This is the fastest way to get more blooms, but they are often smaller and less numerous than the initial display. If the spike has turned yellow or brown, it is no longer viable. It should be cut off at the base to allow the plant to direct its energy towards producing a stronger foundation of roots and leaves, which will fuel a more magnificent bloom on a completely new spike in the future.
Your Action Plan: Deciding the Fate of a Faded Spike
- Assess the Spike’s Condition: Is it still green and firm, or has it turned yellow/brown and dry? The color is your primary signal.
- Inspect for Healthy Nodes: If the spike is green, look for small, unopened bumps (nodes) below where the last flower was. Choose a healthy one.
- Make the Cut (Green Spike): Using a sterile blade, cut the spike roughly one inch above the selected node. This directs the plant’s energy to that point for a potential new branch.
- Remove Completely (Brown Spike): If the spike is brown, it is spent. Cut it as close to the base of the plant as possible to conserve energy for new growth.
- Confirm Your Orchid Type: Remember, this re-blooming technique applies almost exclusively to Phalaenopsis. For Dendrobiums, Cymbidiums, and others, always remove the entire spike after it has finished blooming.
Beyond pruning, another powerful technique for triggering a new bloom cycle is temperature manipulation. This method of deliberate stress mimics the natural seasonal changes that signal to the orchid that it’s time to reproduce.
Case Study: Triggering Blooms with Temperature Variance
As demonstrated in a case study on temperature manipulation by Kew Gardens’ experts, a controlled drop in temperature is a reliable method to initiate flowering. Orchid expert Bala Kompalli explains that if a Phalaenopsis is kept in a consistently warm environment (around 24°C / 75°F), moving it to a location where the night temperature drops to about 14°C (57°F) for several weeks can be the trigger. This 10-degree variance simulates the transition from autumn to winter, signaling the plant’s internal clock to begin producing a new flower spike. This technique is far more effective than simply waiting and hoping for a new bloom.
How to Use Orchids to Symbolize Strength and Longevity for Elders?
An orchid is more than just a decorative plant; it is a powerful symbol, steeped in history and meaning. In many cultures, particularly in Asia, orchids represent integrity, elegance, and friendship. When chosen as a gift for an elder, it transcends being a simple floral arrangement and becomes a profound message of respect, strength, and enduring life. The key is to shift the focus from the fleeting beauty of a cut flower to the incredible resilience and longevity of a living orchid plant.
The symbolism is rooted in the plant’s remarkable biology. Unlike annual plants with a short, predetermined lifespan, an orchid has the potential for near-immortality. This makes it a deeply meaningful gift for celebrating milestones and honoring the wisdom that comes with age. The act of caring for a plant that can outlive its owner is a testament to legacy and continuity.
If an orchid is cared for properly, it can live for an indefinite amount of time, particularly if it is regularly divided. They have been known to live beyond 100 years, outliving the gardeners who plant them.
– Epic Gardening, Post-blooming orchid care guide
To fully leverage this symbolism, consider gifting a species known for its toughness and longevity, such as a Cymbidium orchid. These orchids are not only beautiful but are also known to be particularly tough and long-lived.
Case Study: The Cymbidium as a Symbol of Integrity
Cymbidium orchids, known in Asian cultures as potent symbols of integrity and friendship, are an excellent choice for this purpose. They are cooler-growing species, happy in temperatures between 10-22°C (50-72°F), making them quite resilient in many homes. Their robust nature and the fact that they can produce flower spikes for decades make them a living representation of strength and enduring relationships. Gifting a Cymbidium, along with a note explaining its cultural significance and incredible lifespan, transforms the present into a story of resilience that can be passed down through generations.
By choosing a living orchid, you are not giving a temporary object of beauty, but a partner in time. You are offering a symbol of strength that echoes the elder’s own, a living testament to the beauty of longevity and the enduring power of life.
How to Choose Structure Plants That Complement Modern Furniture?
In a modern interior, a plant is not just a plant; it is a sculptural element that interacts with the furniture, art, and architecture around it. An orchid, with its graceful, arching form, is a perfect starting point, but creating a truly sophisticated « green interior » involves pairing it with other « structure plants. » These are plants chosen for their strong architectural shapes, which serve to ground the space and complement the clean lines of modern design. The goal is to create a dialogue between the organic forms of the plants and the geometric shapes of the furniture.
The selection process is similar to choosing art or textiles. You must consider form, scale, and texture. A tall, vertical plant like a Sansevieria cylindrica (Cylindrical Snake Plant) can echo the slim legs of a mid-century chair or stand as a stark, minimalist column against a bare wall. A plant with large, broad leaves, such as a Fiddle Leaf Fig, can add a bold splash of organic texture and scale, softening a room without cluttering it. Its warm, woody stem can beautifully complement the tones of a teak sideboard or walnut coffee table.
The key is to think in terms of balance and contrast. Use the soft, flowing form of an orchid to soften the hard edge of a concrete side table. Use the sharp, spiky leaves of a snake plant to add dynamic energy next to a plush, low-slung sofa. The following pairings can serve as a guide for building a cohesive and stylish plant collection that enhances, rather than competes with, your modern furniture:
- Minimalist Design: Pair sharp, vertical plants like Sansevieria cylindrica with clean-lined, low-profile furniture to emphasize negative space and verticality.
- Mid-Century Modern: Choose broad-leafed plants like the Fiddle Leaf Fig (Ficus lyrata) or Monstera deliciosa to complement the warm wood tones and organic curves of the era.
- Industrial Concrete: Use the delicate, arching forms of orchids or the feathery fronds of a fern to introduce softness and contrast against the hard lines of concrete tables or metal shelving units.
- Scandinavian Aesthetic: Select sculptural plants with an open structure, like a Strelitzia nicolai (White Bird of Paradise), that allow light to pass through them, preserving sightlines and the feeling of airy spaciousness.
By carefully selecting a few key structure plants, you create a sophisticated backdrop that makes your feature plants, like a blooming orchid, stand out even more. It’s about curating a collection, not just accumulating pots.
Key Takeaways
- Orchid health starts at the roots; transparent pots are essential for photosynthesis and monitoring, not just a design trend.
- Successful re-blooming is an active process involving strategic pruning and temperature drops, not passive waiting.
- Watering should be based on the plant’s observable needs (root color, medium dryness), not a rigid schedule, and never with ice.
How to Create a Potted Plant Jungle on a Concrete Terrace?
Transforming a sterile concrete terrace into a lush, green jungle is an ambitious but deeply rewarding project. A terrace presents a unique set of challenges: intense reflected heat from the concrete, exposure to wind, and potential weight restrictions. However, with strategic planning, you can create a thriving micro-environment where even delicate plants like orchids can flourish. The key is to think like a landscape designer, using layering and protective groupings to build a resilient ecosystem.
The first enemy to conquer is the reflected heat from the concrete surface, which can cook root systems. The solution is twofold: elevate your pots using « pot feet » to allow for air circulation underneath, and choose light-colored containers (white, terracotta, light grey) that reflect sunlight rather than absorb it. For weight restrictions, opt for lightweight fiberglass or resin pots instead of heavy ceramic or concrete, and use a lightweight, soilless potting mix like bark chips for your orchids.
Next, you must manage wind exposure. Instead of scattering your plants, group them together. This creates a pocket of higher humidity and allows the plants to shelter one another. Create a layered defense system: place hardier, wind-resistant plants like bamboo or tall grasses along the outer, most exposed perimeter. These will act as a natural windbreak, creating a calmer, more protected zone in the center where you can place your more delicate specimens, including your orchids. This grouping strategy also creates visual depth, making the space feel more immersive and jungle-like.
Creating this potted jungle is the ultimate expression of a skilled cultivator. It requires applying all the principles of plant care on a larger scale and in a more hostile environment. Here is a checklist for tackling this challenge:
- Combat Reflected Heat: Use pot feet to elevate containers and choose light-colored pots to minimize heat absorption from the concrete.
- Manage Wind Exposure: Group plants together to create a self-sheltering microclimate and use taller, sturdier species as a windbreak on the perimeter.
- Address Weight Restrictions: Opt for lightweight fiberglass or plastic pots and use soilless, bark-based mixes instead of heavy garden soil.
- Create Layering for Depth: Arrange plants by height—tall grasses or bamboo at the back, mid-level shrubs in the middle, and cascading plants like ivy or string-of-pearls at the front.
- Build a Protective Microclimate: Use the hardy outer plants as a barrier to shield more delicate species like orchids, which can be nestled in the protected central area.
Now that you are equipped with the botanical logic behind orchid care, the next step is to apply this knowledge. Begin today by observing your plant not as a static object, but as a living system, and make one small change based on what you’ve learned.