Creating a terrace jungle is an engineering challenge, not just a gardening one; success hinges on mastering the physics of your space before planting anything.
- Structural load, wind forces, and water management are the primary constraints that dictate design choices on a concrete surface.
- Strategic pot clustering and layering create functional microclimates, increasing plant resilience and reducing maintenance.
Recommendation: Before buying a single pot, start by auditing your terrace’s structural limits and sunlight patterns to build a solid foundation for your urban jungle.
That vast, empty concrete terrace feels like a promise and a problem. You envision a lush, green sanctuary, an urban jungle teeming with life. But concrete is a harsh environment—it radiates heat, creates wind tunnels, and offers no forgiveness for water mismanagement. The common advice to « just add some pots and sun-loving plants » often leads to a collection of struggling, sun-scorched specimens and a lingering sense of disappointment. This approach ignores the fundamental nature of the challenge.
Transforming a sterile slab of concrete into a thriving ecosystem requires thinking less like a gardener and more like an urban jungle designer. It’s an exercise in microclimate engineering, structural planning, and hydraulic management. The true secret isn’t about which plants to buy first, but about understanding and taming the physical forces at play. It’s about creating a system where plants don’t just survive, but actively thrive by supporting one another.
But what if the key wasn’t simply fighting against the concrete, but using its limitations to inform a more intelligent, resilient design? This guide shifts the focus from simple horticulture to strategic design. We will deconstruct the process, moving from the invisible structural forces beneath your feet to the architectural impact of your largest statement pot. This article will guide you through the critical engineering and design principles that underpin a truly successful and sustainable terrace jungle.
This comprehensive guide breaks down the essential strategies for transforming your concrete space. We’ll cover everything from foundational safety checks to advanced design techniques, ensuring your urban oasis is not only beautiful but also built to last.
Summary: The Engineer’s Blueprint for a Concrete Terrace Jungle
- Why Must You Check Load-Bearing Capacity Before Buying Large Pots?
- How to Cluster Pots of Different Sizes for Visual Harmony?
- Terracotta or Plastic: Which Pot Material Saves Water on Hot Terraces?
- The Saucer Mistake That Stains Expensive Stone Terraces
- How to Anchor Tall Plants on Windy Rooftop Terraces?
- How to Set Up Drip Irrigation for Patio Pots in One Weekend?
- How to Fill the Bottom of a Giant Pot to Save on Soil?
- How to Use Large Ceramic Pots as Architectural Focal Points?
Why Must You Check Load-Bearing Capacity Before Buying Large Pots?
Before you get swept away by visions of massive specimen trees, the first and most critical step is a structural reality check. A large pot filled with wet soil and a mature plant represents a significant, concentrated load. Most residential balconies are designed for a distributed load of 50-100 pounds per square foot, and a single giant pot can easily exceed this for its footprint. Ignoring this is not just a gardening mistake; it’s a serious safety risk.
The total weight is a combination of the pot, the soil (which can double in weight when saturated with water), and the plant itself. A cubic foot of wet soil alone can weigh up to 100 pounds. This is where material science becomes your best ally. The dream of a stone or concrete pot may be aesthetically pleasing, but it’s often structurally impractical. Shifting your mindset to lightweight materials is the first principle of terrace jungle engineering. Modern composites offer the look of stone or terracotta at a fraction of the weight, immediately expanding your design possibilities without compromising structural integrity.
This table illustrates how modern materials can solve the weight problem, allowing for larger, more impactful plantings without overloading the structure. Choosing fiberglass or resin is an engineering decision that enables your design vision.
| Pot Material | Weight Advantage | Durability | Aesthetic Appeal |
|---|---|---|---|
| Terracotta/Concrete | Heavy (baseline) | Fragile, chips easily | Classic, natural look |
| Fiberglass | Lightweight, fraction of stone weight | Excellent, weather-resistant | Can imitate stone/wood |
| Resin Composite | Very lightweight, easy to move | UV-stabilized, frost-resistant | Modern, versatile finishes |
| Fiberstone | Light yet stable | Strong, long-lasting | Stone appearance at lower weight |
The choice is clear: to go big, you must first go light. This initial calculation is the non-negotiable foundation upon which your entire green oasis will be built, ensuring it is both beautiful and safe.
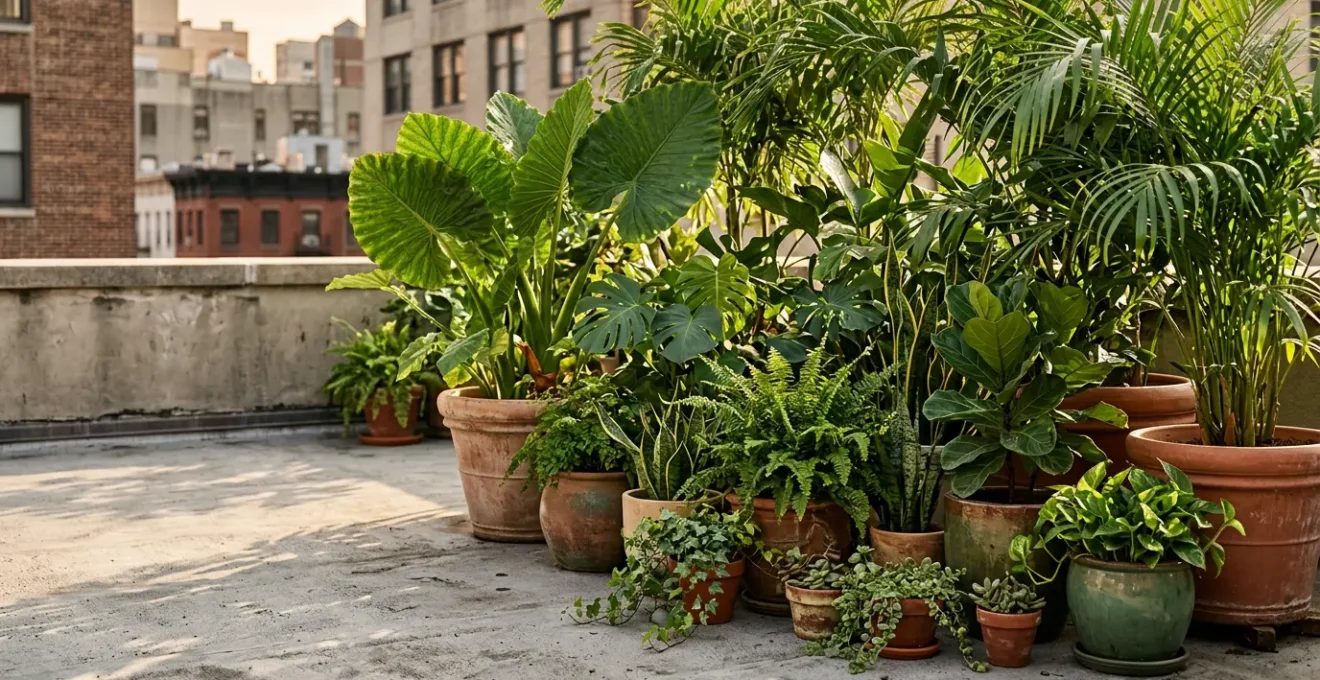
How to Cluster Pots of Different Sizes for Visual Harmony?
Once you’ve addressed the structural constraints, you can move on to the art of arrangement. The most common mistake is scattering pots individually across the terrace, which creates a cluttered, disconnected look and exposes each plant to the harshest conditions. The professional approach is to think in terms of clustered ecosystems. Grouping pots isn’t just about creating a pleasing visual; it’s a powerful form of microclimate engineering.
By clustering pots of different heights and sizes, you replicate the natural layers of a forest: a tall « canopy » layer, a mid-height « understory, » and a low « groundcover. » This creates a pocket of increased humidity, buffers plants from drying winds, and allows you to position more delicate species in the shade cast by their taller neighbors. This synergy is the key to expanding the variety of plants that can thrive on your terrace.
Case Study: The Layered Ecosystem Approach
A leading container garden designer in San Francisco has perfected this technique over decades. By applying the « Canopy-Understory-Groundcover » principle, the designer creates self-sustaining microclimates on exposed concrete terraces. Large pots with tree-like plants reaching 10-15 feet create the canopy, providing essential shade. This allows for an understory of medium-sized pots with shade-loving plants. Finally, small pots with trailing groundcover conceal the bases of the larger containers, completing the jungle effect and trapping moisture. As this layered approach demonstrates, grouping pots raises local humidity and provides wind protection, dramatically expanding the palette of plants that can succeed in a harsh urban environment.
This illustration visualizes how the different layers work together to form a cohesive, living arrangement. It’s a move away from isolated specimens towards a dynamic, interacting plant community.
Think of your pot clusters as islands of life. The « thriller, filler, spiller » rule is a good starting point: a tall, dramatic plant (thriller), mid-size foliage or flowers (filler), and a trailing plant that cascades over the pot’s edge (spiller). Applying this logic to a group of pots, not just one, is how you start to build a truly lush and visually harmonious jungle.
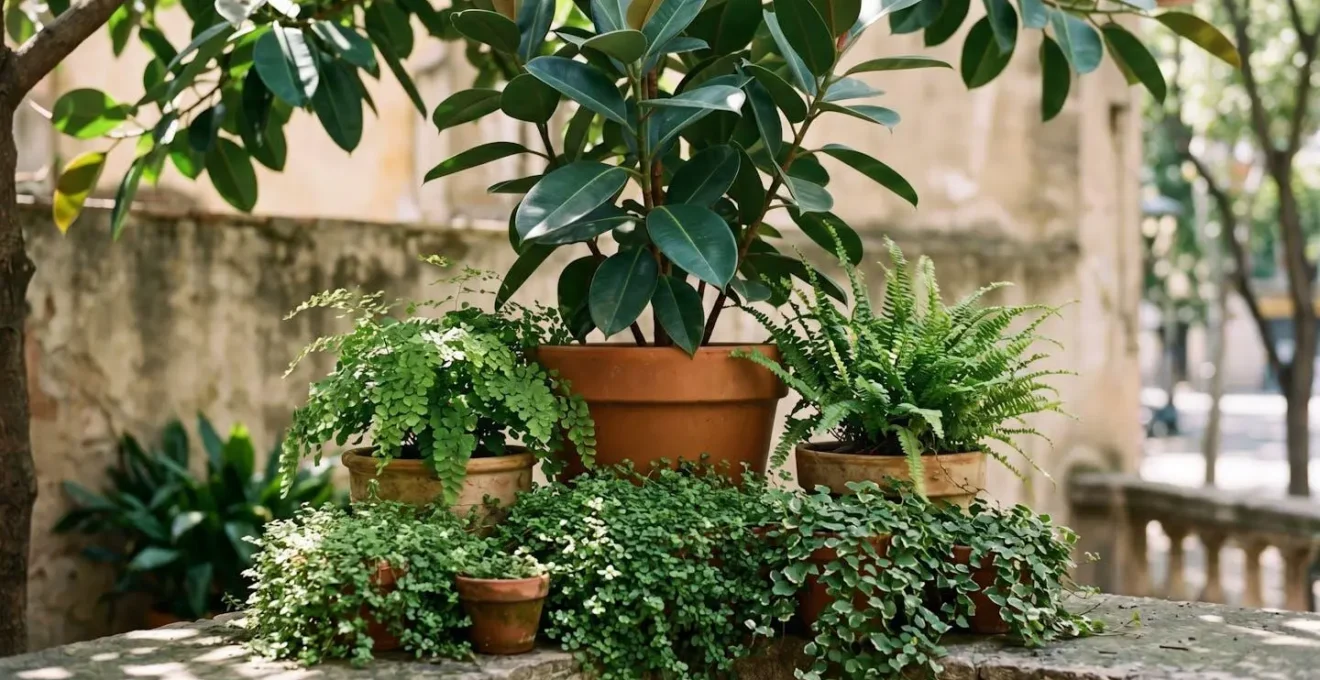
Terracotta or Plastic: Which Pot Material Saves Water on Hot Terraces?
The debate between terracotta and plastic pots is a classic one, but on a hot concrete terrace, it’s the wrong question. The real enemy is the intense radiant heat from the concrete, which can cook a plant’s root ball and accelerate water evaporation. Neither material on its own is a perfect solution. Porous terracotta wicks moisture away, cooling roots but drying out soil rapidly. Non-porous plastic retains moisture but can overheat in direct sun, essentially boiling the roots.
The solution lies not in choosing a side, but in a hybrid strategy: thermal insulation. Your goal is to create a buffer zone that protects the roots from extreme temperature swings. This can be achieved in several ways. The simplest is mulching the soil surface, which research on container gardening water conservation shows that can lead to an up to 70% reduction in water evaporation. But the most effective technique is double-potting.
The double-potting method combines the best of both worlds. You plant in a simple, lightweight plastic pot (for moisture retention) and then place this pot inside a slightly larger, more decorative terracotta or ceramic pot. The air gap between the two pots acts as a powerful insulator, keeping the root zone cool and stable, much like a thermos. This single technique can be a game-changer for plant health on a sun-baked terrace, dramatically reducing watering frequency and stress on your plants.
By using this method, you gain the aesthetic appeal of terracotta while leveraging the practical water-saving benefits of plastic, all while providing critical root protection. It transforms the pot from a simple container into a high-performance insulation system.
Your Action Plan: Implementing the Double-Potting Technique
- Assess your needs: Select a functional plastic nursery pot appropriately sized for your plant’s current root system.
- Source your materials: Choose a decorative outer pot (like terracotta) that is 1-2 inches larger in diameter.
- Construct the system: Place the plastic pot inside the decorative one, ensuring a consistent air gap between the two walls.
- Optimize performance: This air gap is now your thermal insulation layer, protecting roots from heat and cold.
- Integrate and maintain: Water the plant in the inner plastic pot as usual. The system now combines moisture retention with temperature regulation.
This strategic approach to potting is a cornerstone of efficient water management, turning a harsh environment into a more hospitable one for your plants.
The Saucer Mistake That Stains Expensive Stone Terraces
Water is life for your plants, but it can be death for your expensive stone or paver terrace. A common and costly mistake is placing a pot directly in a saucer on the terrace surface. This seemingly sensible practice traps water, creating a perpetually damp spot that fosters algae growth and, more insidiously, leads to permanent mineral staining. The saucer itself isn’t the problem; the problem is the lack of airflow and the chemical reactions happening underneath it.
When you water, excess minerals from the soil and fertilizer leach out. In a terracotta pot, this process is visible as efflorescence—the white, powdery residue that forms on the outside. As the experts explain, this is a natural wicking process.
The white powder that forms on terracotta’s exterior is efflorescence: mineral salts from your potting mix wicked through the porous wall and deposited on the surface as water evaporates.
– Colorado State University Extension, Terracotta vs Plastic Pots: Container Gardening Material Guide
When a pot sits flat in a saucer, these same mineral-rich salts concentrate in the trapped water. This solution then seeps into the porous stone of your terrace, leaving behind a stubborn, chalky ring that can be nearly impossible to remove. You’re essentially creating a chemistry experiment that permanently etches your hardscaping.
The solution is elegantly simple: elevate everything. Never let the base of a pot or its saucer sit directly on the terrace. Use « pot feet, » small blocks of terracotta, stone, or even durable plastic, to lift the pot and saucer an inch or so off the ground. This small gap is revolutionary. It allows air to circulate, enabling the area to dry out completely between waterings. This prevents algae, stops mineral-rich water from being trapped against the stone, and ultimately preserves the beauty and value of your terrace surface. This single, inexpensive habit is one of the most important you can adopt.
How to Anchor Tall Plants on Windy Rooftop Terraces?
On a rooftop or exposed terrace, wind is not just a nuisance; it’s a powerful structural force. A tall, top-heavy plant acts like a sail, catching gusts that can easily topple it, causing damage to the plant, the pot, and potentially creating a serious safety hazard. The key to wind-proofing your vertical jungle is to think like a naval architect, focusing on lowering the center of gravity and creating secure anchor points.
The first line of defense is internal ballast. Instead of filling the entire pot with lightweight soil, dedicate the bottom third of the container to heavy, dense materials. Large rocks or, even better, sealed bags of sand or gravel, create a low, stable base. This is crucial: the ballast must be at the very bottom to be effective. Placing rocks in the middle or top of the pot will actually make it *less* stable. Ensure any ballast material does not obstruct the drainage holes, as water-logged soil adds immense weight and can harm the plant.
For truly exposed locations or very tall plants, internal ballast may not be enough. This is where architectural anchoring comes in. This involves physically securing the pot or the plant’s support structure to a permanent fixture like a railing, wall, or the building itself. This can be as simple as using heavy-duty, UV-resistant straps to lash a pot to a railing. For a more permanent and professional solution, stainless steel eye bolts can be installed in structural elements, with discreet wires and turnbuckles used to brace a tall trellis or the plant’s main stem. This provides storm-proof security while being visually unobtrusive.
Choosing a pot with a wide, low-profile base also dramatically increases stability. A pot that is wider at its base than at its top is inherently more resistant to tipping. By combining a stable pot shape, internal ballast, and, where necessary, external anchoring, you can confidently add the vertical « thriller » elements that give your terrace jungle its dramatic scale, knowing they are secure against the elements.
How to Set Up Drip Irrigation for Patio Pots in One Weekend?
The single greatest challenge of a concrete terrace jungle is watering. The elevated heat and wind exposure mean pots dry out with astonishing speed. Manual watering can quickly become a relentless, time-consuming chore. Automating this process with a drip irrigation system is not a luxury; it’s a foundational step for creating a sustainable, low-maintenance oasis. It delivers water slowly and directly to the root zone, minimizing evaporation and ensuring each plant gets a consistent supply.
Setting up a basic system is a surprisingly straightforward weekend project. The heart of the system connects directly to your outdoor faucet (or « spigot »). This « head assembly » consists of four key components, installed in order: a timer (the brain), a backflow preventer (for safety), a filter (to prevent clogs), and a pressure regulator (to protect the system). From there, a main ½-inch supply line acts as the artery, running along the perimeter of your terrace. Smaller ¼-inch micro-tubing branches off this main line to each individual pot or cluster, delivering water via emitters chosen for each pot’s specific needs.
The beauty of a drip system is its precision. You can assign different zones or use emitters with different flow rates (measured in Gallons Per Hour, or GPH) for plants with varying water requirements. A large pot with a thirsty tree might get a 2 GPH emitter, while a small succulent pot gets a 0.5 GPH emitter. For a truly « set it and forget it » solution, some gardeners opt for large self-watering planters. In fact, customers report that 40-60 inch self-watering planters can survive for 3-4 weeks without intervention, making them an excellent low-tech alternative for key specimen plants.
Ultimately, a well-planned irrigation system is the hydraulic engine of your terrace jungle. It frees you from the daily chore of watering and provides the stable, consistent moisture that plants need to thrive in such a demanding environment.
Your Weekend Plan: Drip Irrigation System Audit
- Points of contact: Identify your outdoor water source and map the most discreet path for the main ½-inch tubing along walls or behind pot clusters.
- Collecte: Inventory the essential components needed: a multi-channel timer, backflow preventer, filter, pressure regulator, tubing, fittings, and various GPH-rated drippers.
- Coherence: Confront your plant list with emitter choices. Does the water-loving fern get a higher GPH dripper than the drought-tolerant lavender? Adjust accordingly.
- Mémorabilité/émotion: Review your tubing layout. Is it a visible eyesore or cleverly hidden? Plan to run micro-tubing up through pot drainage holes for a truly invisible finish.
- Plan d’intégration: Schedule your project: Day 1 for purchasing and head assembly. Day 2 for laying tubing, installing emitters, and testing the system for leaks and proper duration.
How to Fill the Bottom of a Giant Pot to Save on Soil?
A giant pot is an incredible focal point, but it presents a giant problem: filling it entirely with potting soil is incredibly expensive, makes the pot astronomically heavy, and is often unnecessary for the plant’s root system. The secret to managing these behemoths is to use lightweight void fillers in the bottom half of the pot. However, what you choose to fill this space with is critical; the wrong material can compact, leach chemicals, or create a waterlogged mess.
The most common mistake is to follow the old advice of adding a layer of gravel or rocks for drainage. This is a myth. In reality, it creates a « perched water table » where water sits in the soil just above the gravel layer, leading to root rot. Furthermore, it adds significant, unnecessary weight. Similarly, biodegradable materials like wood chips or packing peanuts should be avoided, as they will decompose over time, causing the soil level to sink and potentially robbing the soil of nitrogen.
The correct approach is to use inert, stable, and lightweight materials that simply take up space. The best and most readily available options are sealed plastic containers. Empty, clean, and capped milk jugs, soda bottles, or water bottles are perfect. They are lightweight, will not break down, and displace a large volume. Another excellent technique is to place a smaller, empty plastic nursery pot upside down at the bottom of the giant pot. This creates a large, stable void with minimal material.
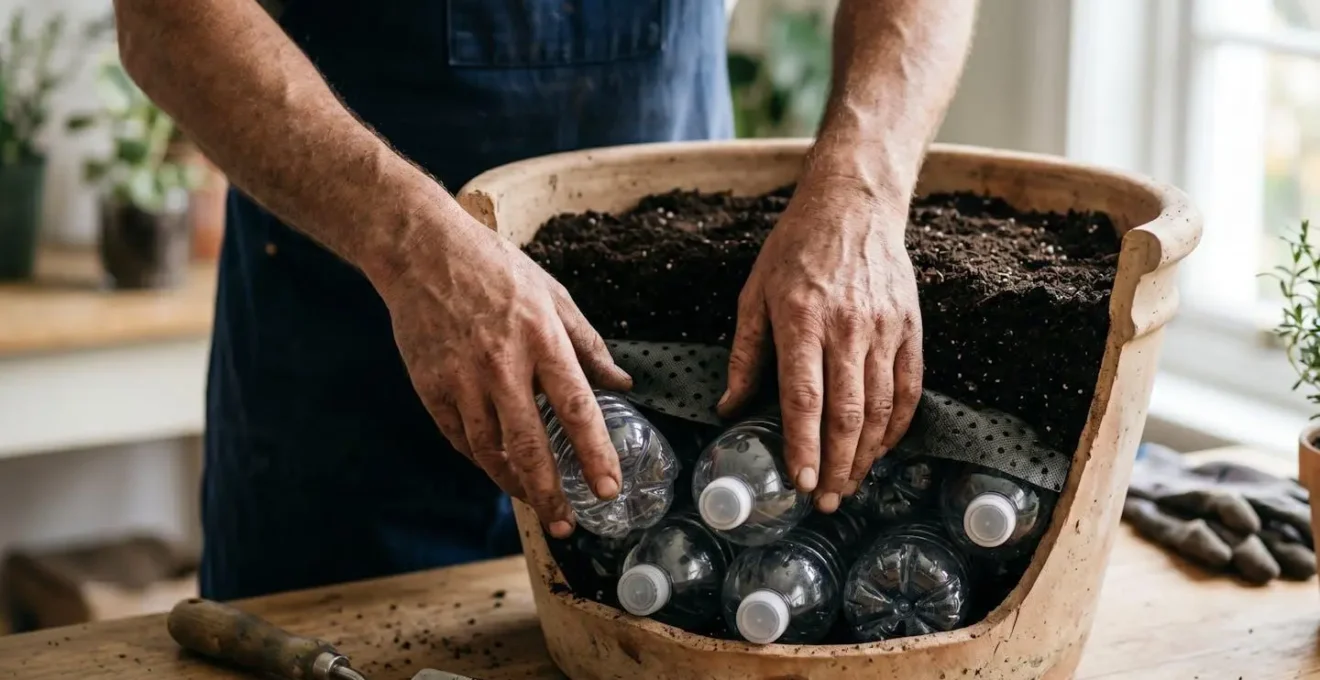
Whatever filler you use, it’s essential to place a layer of permeable landscape fabric on top of it before adding your potting soil. This barrier prevents the soil from washing down into the crevices of your filler material while still allowing excess water to drain away. By using this technique, you can have the grand scale of a giant pot without the excessive weight and cost, another example of smart engineering for your terrace jungle.
Key Takeaways
- Structural Safety First: Always verify the load-bearing capacity of your terrace before selecting large pots and use lightweight materials to maximize scale without risk.
- Engineer Microclimates: Cluster pots in layered groups (canopy, understory, groundcover) to increase humidity, provide wind protection, and expand your plant palette.
- Manage Water & Heat: Use double-potting and elevation (pot feet) to insulate roots from heat, conserve water, and prevent permanent stains on your terrace surface.
How to Use Large Ceramic Pots as Architectural Focal Points?
Once the foundational, engineering aspects of your terrace jungle are in place—weight managed, water controlled, wind tamed—you can elevate your design from merely functional to truly architectural. Large pots, especially those with a distinctive shape, color, or texture, are not just containers for plants; they are powerful sculptural elements in their own right. A well-placed, significant pot can act as a focal point, drawing the eye, anchoring a seating area, or creating a sense of destination at the end of a path.
The key is to treat them with the same consideration you would a piece of sculpture. Don’t crowd them. Give a major statement pot its own space to command. Consider its silhouette from all angles and how it interacts with the surrounding architecture. The plant within should complement the pot, not overwhelm it. Sometimes, a pot with a truly exceptional form is best paired with a very simple, understated plant, allowing the vessel itself to be the star.
The architectural role of your pots doesn’t have to end at sunset. Strategic lighting can completely transform your terrace jungle into a magical, dramatic space at night. This is where you complete the transformation from a collection of plants to a fully realized landscape design.
A simple, low-voltage outdoor spotlight aimed at the base of a focal pot can transform a terrace at night. It highlights the pot’s form and creates dramatic shadows from the foliage, extending the enjoyment of the ‘jungle’ after sunset.
– Editorial Team, Backyard Design: How to Create a Lush, Jungle-style Garden Haven
By thinking architecturally, you give your terrace jungle permanence and presence. The pots become integrated elements of your home’s design, providing structure and beauty throughout the seasons. This is the final step, where your well-engineered system transcends its practical origins to become a true work of art—a living, breathing extension of your home.
By applying these engineering and design principles, you can systematically transform any barren concrete slab into the lush, thriving urban jungle you’ve envisioned. Start today by assessing your space not just as a gardener, but as a designer.