
Creating a durable walkway border is a matter of spatial engineering, not just choosing tough plants.
- The resilience of a border depends on the structural mechanics of plants (flexible vs. brittle) and their strategic placement in buffer zones.
- Maintaining a proportional relationship between path width and plant height is crucial to avoid a claustrophobic feel and ensure clear circulation.
Recommendation: Shift your focus from individual plant survival to designing a complete circulation system where height, width, and plant structure work together to guide movement and endure contact.
For many homeowners, the dream of a lush, fragrant flower border along a walkway quickly turns into a reality of trampled stems and compacted soil. The common advice is to simply plant « tough » species, but this often leads to a functional but uninspired landscape. We see homeowners build expensive retaining walls or fences out of frustration, believing that plants and paths are fundamentally incompatible. This approach misses the true potential of a living border to define space, create a sensory experience, and guide movement through the garden.
The real issue isn’t a lack of durable plants; it’s a lack of understanding of landscape circulation dynamics. What if the key to a resilient border wasn’t just the plant’s hardiness, but a holistic system of spatial engineering? This involves considering the interplay of plant height and path width, the mechanical structure of a plant’s foliage, and the strategic placement of scents to create an inviting yet robust pathway. It’s about designing a route that anticipates human behaviour and uses plants to absorb or deflect contact gracefully.
This guide moves beyond simple plant lists to give you the principles of a landscape circulation expert. We will deconstruct the common mistakes that lead to failing borders and provide a framework for designing walkways that are both beautiful and built to last. You will learn how to select plants based on their structural resilience, master proportions for a feeling of openness, and use scent as a powerful tool to enhance the journey through your garden.
To help you master this approach, we’ve broken down the essential components of designing a foot-traffic-proof flower border. The following sections will guide you through the key decisions, from plant selection to long-term maintenance, transforming your walkways into functional and beautiful garden features.
Summary: A Blueprint for Resilient and Fragrant Walkway Borders
- Why Plant Thyme Between Pavers for Scent Release?
- The Height Mistake That Makes Garden Paths Feel Claustrophobic
- Lavender or Alchemilla: Which Border Plant Survives Occasional Steps?
- How to Position Solar Lights Within Borders Without damaging Roots?
- When to Trim Border Plants to Keep Walkways Clear?
- Jasmine or Lavender: Which Scent Best Greets Visitors?
- How to Position Planters Without Blocking Patio Access Routes?
- How to Build a Perennial Garden That Requires Less Than 2 Hours of Care Monthly?
Why Plant Thyme Between Pavers for Scent Release?
Planting between pavers is a masterstroke of functional design, and creeping thyme is the ideal candidate for this task. Unlike traditional border plants that sit beside a path, thyme integrates directly into the walking surface. This addresses the core challenge of foot traffic not by resisting it, but by embracing it. The genius of this approach lies in turning a potential point of damage into a moment of sensory delight. As you walk, the light pressure on the thyme releases its essential oils, creating a fragrant puff of scent with each step. This transforms a mundane walkway into an interactive and aromatic experience.
Creeping thyme is uniquely suited for this role due to its structure and hardiness. It grows in a low, dense mat that can handle being stepped on. Moreover, research shows that creeping thyme is highly drought-tolerant and withstands significant foot traffic, making it a low-maintenance choice for the gaps between stones or pavers. Its ability to release fragrance upon contact is a key feature that sets it apart from other groundcovers. This « contact scent » is a crucial principle in fragrant garden design, ensuring the aroma is delivered precisely when and where it’s most appreciated.
Case Study: Successful Thyme Varieties for Paver Installations
A detailed study on paver planting highlights the success of specific thyme varieties like ‘Gold Coin’ and ‘Elfin’. Their compact growth habits are ideal for filling tight spaces without becoming overgrown. The study revealed that proper installation is key: gardeners achieved the best results by first loosening the soil between pavers, enriching it with organic matter, and spacing the small thyme plants about 6 to 12 inches apart. This spacing allowed the plants to spread and form a dense, fragrant carpet over time, ensuring complete coverage and maximizing the scent release across the entire walkway.
By embedding fragrance into the path itself, you are practicing a sophisticated form of spatial engineering. The scent becomes an integral part of the path’s identity, defining the circulation route not just visually, but through a memorable olfactory experience. This makes the journey from one part of the garden to another more engaging and intentional.
The Height Mistake That Makes Garden Paths Feel Claustrophobic
A common design flaw that undermines an otherwise beautiful walkway is a disregard for proportional scale. When border plants are too tall relative to the path’s width, they create a « tunnel effect. » This makes the walkway feel narrow, enclosed, and even claustrophobic, discouraging its use. A well-designed circulation route should feel open and inviting, guiding a person comfortably through the space. The height of your border plantings is as critical as the width of your path in achieving this sense of effortless flow.
The solution lies in applying a simple but powerful design principle: the 1/3 height rule. As a general guideline, the mature height of your border plants should not exceed one-third of the path’s width. For example, a three-foot-wide secondary path feels most comfortable when bordered by plants that are no more than one foot tall. This ratio maintains a sense of openness and visual balance, ensuring the plants frame the path rather than consuming it. Ignoring this proportion is the single biggest mistake that leads to overgrown, intimidating walkways.
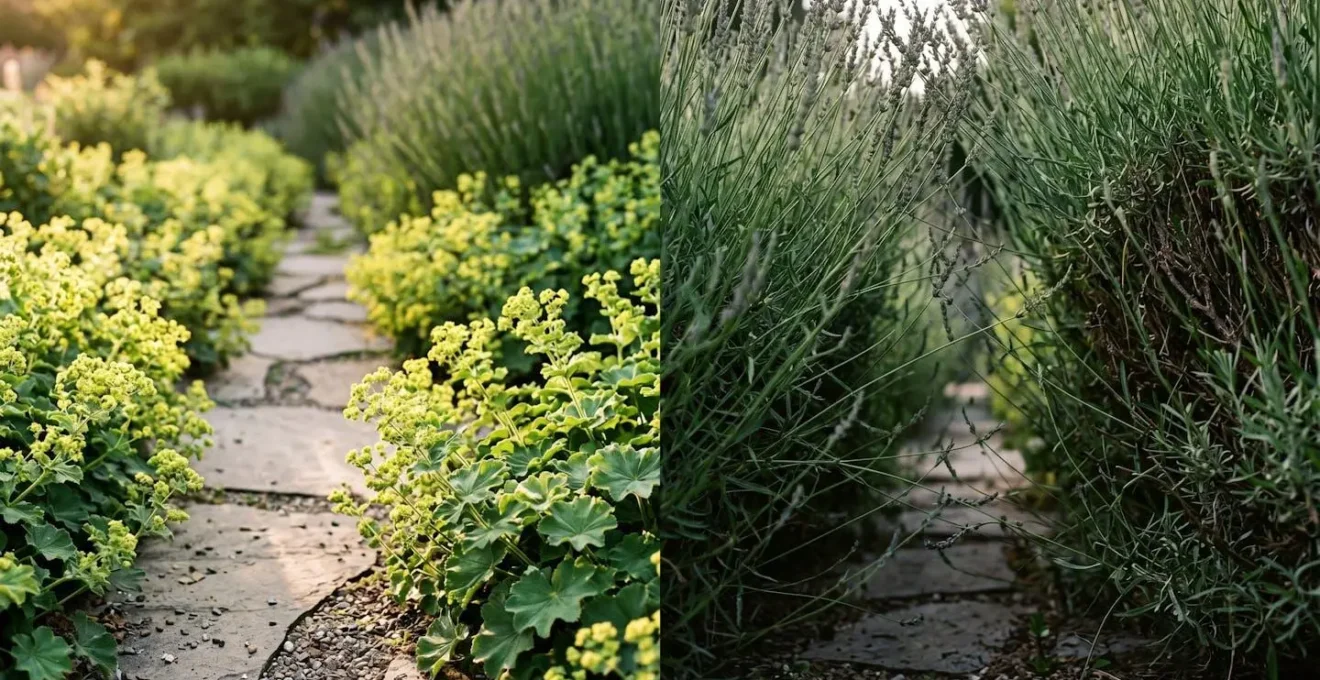
As this image demonstrates, the contrast is stark. The low-growing plants on one side create an open prospect, while the overgrown foliage on the other creates an encroaching, tunnel-like effect. To engineer a comfortable circulation route, you must consider both horizontal and vertical space. Here are the key guidelines for path width and plant height:
- Primary Paths: For frequent use or for two people to walk side-by-side, maintain a minimum width of 4 feet.
- Secondary Paths: For single-person passage, a width of 2 to 3 feet is adequate.
- Plant Spillover: Always factor in an extra 4-12 inches of width on each side to accommodate the natural « spill » of cascading plants without blocking the actual walking surface.
- Visual Tapering: On curved paths, place lower plants on the inside of the curve and slightly taller ones on the outside to create a graceful line that makes the path feel wider and more dynamic.
Lavender or Alchemilla: Which Border Plant Survives Occasional Steps?
When designing a border for a high-traffic area, homeowners often select plants based on reputation alone. Lavender is a classic choice for fragrance and beauty, but its performance at the immediate edge of a path can be disappointing. The key to choosing the right plant is understanding its structural resilience—how it physically responds to pressure. This is where a plant like Alchemilla (Lady’s Mantle) reveals its superiority for path-edge placement.
The difference lies in their fundamental structure. Lavender has woody stems that are rigid and brittle. When stepped on, they don’t bend; they snap. A broken lavender stem is lost for the season, leaving a permanent-looking gap in your border. In contrast, Alchemilla has flexible, herbaceous foliage. Its soft, fan-like leaves and pliant stems can bend under occasional pressure and will often bounce back within hours. This « bend, don’t break » characteristic makes it far more forgiving of accidental contact from a stray foot or a garden hose being dragged along the path.
This comparative analysis from a recent study on path-side planting clearly illustrates the differences in resilience.
| Characteristic | Alchemilla (Lady’s Mantle) | Lavender |
|---|---|---|
| Structure Type | Flexible herbaceous foliage | Woody stems |
| Foot Traffic Tolerance | Moderate – can bend and recover | Low – stems snap under pressure |
| Recovery Rate | Fast (within hours for foliage) | Slow (broken stems lost for season) |
| Best Placement | Path edges with occasional contact | Behind buffer zone, 6+ inches from path |
| Growth Habit | Cascading, spills gracefully onto paving | Upright, rigid structure |
| Resilience Type | Bendable (resilience) | Brittle (snaps) |
A sophisticated solution is to implement a two-tier buffer zone. This strategy allows you to enjoy the beauty of more delicate plants like lavender without risking damage. Plant an ultra-tough, ground-hugging plant like Creeping Thyme or Sedum in the first 6 inches directly bordering the path. Behind this resilient frontline, in the second zone (6-18 inches back), you can then plant your visually appealing but more fragile lavender. This way, the buffer zone absorbs most of the accidental contact, protecting the woody stems of the lavender behind it.
How to Position Solar Lights Within Borders Without damaging Roots?
Integrating lighting into walkway borders is essential for safety and ambiance, but it’s often done as an afterthought. Sticking solar lights randomly into the soil can damage the delicate root systems of your perennials and create harsh, unflattering pools of light. The expert approach is to treat light as a design element, positioning it strategically to enhance plant textures and define the path’s edge without compromising plant health. The goal is to illuminate the way, not the entire garden bed.
The most effective and root-friendly technique is to install lights at the very beginning of the planting process or during a seasonal division of perennials. This allows you to see exactly where the root balls are and place the light’s stake in an empty pocket of soil, minimizing disturbance. If you’re retrofitting lights into an established border, gently probe the soil with your fingers or a thin stake to find a clear spot between major root clusters. Never force a light stake into the ground; if you meet resistance, you are likely hitting a significant root. Reposition and try again.
Beyond placement, the lighting technique itself is crucial for creating a sophisticated effect. Instead of pointing lights directly at plants, use a technique called « grazing. » This involves positioning the light low to the ground and close to the plant, casting the beam almost parallel to the foliage. This method dramatically highlights the plant’s texture, as shown in the image below.
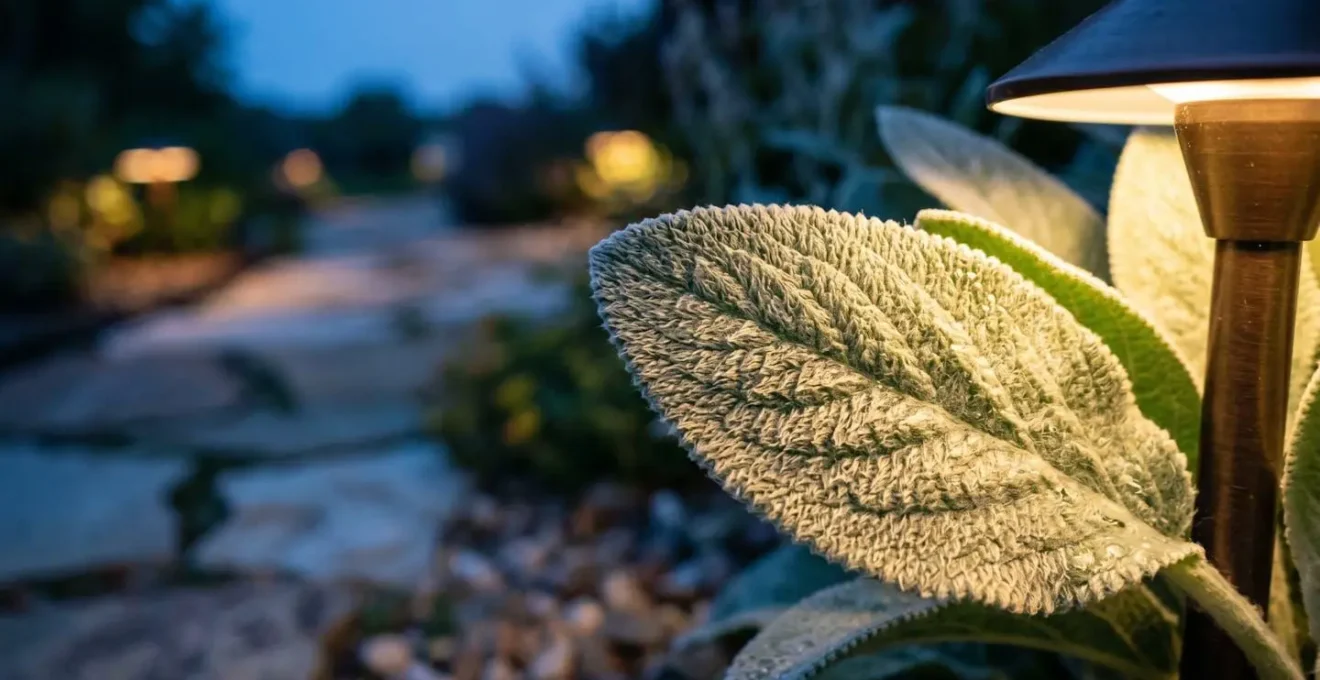
This grazing light picks up every fiber and dewdrop on a leaf’s surface, turning plants like Lamb’s Ear (Stachys byzantina) or the fronds of a fern into living sculptures at night. It provides enough light to define the path’s edge for safe navigation while creating an atmosphere of subtle drama and intimacy. This is a far more effective use of light than simply flooding the area, as it works with the plants to create visual interest and guide the eye along the circulation route.
When to Trim Border Plants to Keep Walkways Clear?
Maintaining a clear walkway is a constant battle for many gardeners. The default approach is reactive: waiting for plants to flop over the path and then cutting them back harshly, often sacrificing blooms and creating an ugly, butchered look. A more strategic, preventative approach is to manage plant growth *before* it becomes a problem. The key is timely, selective pruning that encourages sturdier, more compact plants that are less likely to collapse onto your path in the first place.
The single most effective technique for this is the « Chelsea Chop. » This pruning method is performed in late May to early June, just as tall herbaceous perennials are putting on significant growth. By cutting the stems back by one-third to one-half, you achieve several benefits. According to the Royal Horticultural Society, this technique not only creates shorter, sturdier plants that can support themselves, but it also delays flowering by four to six weeks. This can be used to stagger bloom times and extend the season of interest.
For walkway borders, a selective chop is particularly brilliant. Instead of cutting back the entire clump, only chop the front half of the plant—the part closest to the path. This creates a tiered effect where the shorter, sturdier stems at the front physically support the taller, un-chopped stems behind them, preventing the entire plant from flopping forward. This is a perfect example of horticultural engineering to maintain a clear circulation route.
Action Plan: The Chelsea Chop for Walkway Maintenance
- Assess Timing: Perform the chop in late May or early June, when perennials like Phlox, Sedum, or Asters have reached about one-third of their final height.
- Select Technique: For border clumps, decide between an all-over chop for compactness or a selective chop (front half only) to create a self-supporting structure.
- Execute the Cut: Using sharp, clean shears, cut the selected stems back by approximately one-third to one-half their current height.
- Consider Winter Structure: Plan to leave the structural skeletons of plants like ornamental grasses and coneflowers untrimmed over winter. Their stems will help visually define the path edge even under a layer of snow.
- Evaluate and Adjust: Observe the results. If plants are still too floppy, cut them back harder the following year. If they are too short, chop less.
Finally, don’t be too quick to « clean up » in the fall. Leaving the dried seed heads and stems of plants like Echinacea (coneflower) and sturdy grasses provides crucial winter interest and helps to maintain the visual edge of the path through the dormant season.
Jasmine or Lavender: Which Scent Best Greets Visitors?
Choosing a scent for an entryway or primary walkway is about more than just picking a « nice » smell; it’s about curating an emotional response. The fragrance that greets your visitors sets the tone for their entire experience. Jasmine and Lavender are two popular choices, but they create vastly different atmospheric effects due to the nature of their fragrance. Your decision should be based on the specific feeling you want to evoke: a dramatic « wow » moment or a gentle, calming « welcome. »
The key difference is the concept of « scent throw. » Jasmine has a large scent throw, meaning its powerful, exotic perfume can fill the air and be detected from a distance, especially at dusk. It creates a memorable, immersive experience—a true statement fragrance. Lavender, on the other hand, is primarily a « contact scent. » Its full, herbal aroma is best released when you brush against the foliage. This makes it more intimate and subtle, creating a sense of calm and familiarity as someone walks by.
This strategic difference in scent delivery dictates their optimal placement for greeting visitors.
| Characteristic | Jasmine | Lavender |
|---|---|---|
| Psychological Impact | ‘Wow’ moment – dramatic, exotic, memorable entrance | ‘Welcome’ feeling – calm, familiar, gentle greeting |
| Scent Type | Large ‘scent throw’ – perfumes air from distance | ‘Contact scent’ – requires brushing to release full aroma |
| Optimal Placement | Can be planted 2-3 feet from path; effective further away | Best planted right at path edge for maximum fragrance release |
| Peak Fragrance Time | Most fragrant at dusk and overnight | Consistently fragrant in full sun throughout day |
| Best Use | Evening-use areas: front porches, patios, climbing on nearby walls | Daytime pathways, narrow entryways, sunny walkways |
| Sunlight Needs | Full sun to moderate shade | Full sun (6+ hours daily) |
Therefore, for a front porch or patio used in the evenings, a climbing Jasmine on a nearby wall is a superb choice. Its scent will perfume the entire area, creating a luxurious and welcoming atmosphere for arriving guests without needing to be right on the path. For a narrow, sunny walkway leading to the front door, Lavender planted at the very edge is perfect. Visitors will brush against it as they pass, releasing its calming scent and creating a gentle, interactive greeting. This is a functional use of fragrance to enhance the circulation route.
How to Position Planters Without Blocking Patio Access Routes?
On patios and hardscapes, planters are the primary tool for introducing greenery, but they are often placed in ways that obstruct natural movement, creating frustrating bottlenecks. The goal is to use planters not as obstacles, but as tools to define and enhance the flow of traffic. Instead of forcing people to walk around awkwardly placed pots, a landscape circulation expert uses them to frame the natural pathways people want to take.
The first step is to identify the « desire paths. » Before placing a single planter, observe your patio for a few days. Where do people naturally walk to get from the door to the grill, or from the seating area to the lawn? These invisible lines of movement are your desire paths. Your planter arrangement should reinforce these routes, not fight them. Position groups of planters to create « soft rooms, » visually separating a dining zone from a lounging zone without building a solid wall. This maintains an open feel while creating functional, defined spaces.
A powerful technique for arranging planters is the « Anchor and Float » method. This creates a look that is both intentional and natural. The process is straightforward:
- Place the Anchor: Start with one very large, substantial planter. Place it in a corner, against a wall, or at the end of a sightline to act as a strong visual anchor. This gives the arrangement weight and a clear focal point.
- Float the Satellites: Next, arrange a few smaller, related planters asymmetrically near the anchor. These « floating » pots should vary in height and size to create visual interest and rhythm. They lead the eye from the anchor into the space.
- Maintain Clearances: As you arrange your planters, constantly check your clearances. Ensure you always leave a minimum of 3 feet of clear passage for comfortable single-person navigation. For main arteries, aim for 4-5 feet to allow two people to pass each other without turning sideways.
By using planters to frame desire paths and create soft rooms, you are actively managing the circulation route of your patio. This transforms a collection of pots from a simple decoration into a functional part of your landscape’s spatial design, guiding movement and making the space more intuitive and pleasant to use.
Key Takeaways
- Design for Resilience, Not Just Resistance: Choose plants with flexible, herbaceous structures (like Alchemilla) for path edges, as they bend and recover, unlike brittle, woody plants (like Lavender) that snap.
- Proportion is Everything: To avoid a claustrophobic « tunnel effect, » ensure your border plant height does not exceed one-third of the walkway’s width.
- Engineer Scent Strategically: Use « contact scents » (Thyme, Lavender) where people will brush against them and « ambient scents » (Jasmine) to perfume an area from a distance.
How to Build a Perennial Garden That Requires Less Than 2 Hours of Care Monthly?
The ultimate goal for any functional garden design is creating a system that is largely self-sustaining. A beautiful walkway border that demands constant weeding, watering, and fussing is a failed design. Achieving a low-maintenance perennial garden that requires less than two hours of care per month is not a fantasy; it’s the result of smart, upfront spatial engineering and system-based thinking. Approximately 80% of garden maintenance time is spent on three tasks: watering, weeding, and edging. By designing a system that automates or eliminates these chores, you free yourself to simply enjoy the garden.
The foundation of this system is built in layers from the ground up. First, install a commercial-grade weed barrier fabric over the prepared soil. This single step blocks the vast majority of weeds from ever germinating. Second, apply a 3-inch layer of shredded bark mulch on top of the fabric. This layer blocks sunlight from reaching any opportunistic weed seeds on the surface, retains crucial soil moisture, and reduces water evaporation. Third, install a drip irrigation line beneath the mulch, connected to an automatic timer. This trifecta—weed fabric, deep mulch, and automated drip irrigation—effectively eliminates the bulk of routine garden labor.
With the foundation in place, your planting strategy becomes the final piece of the low-maintenance puzzle. Instead of planting individual specimens, create « plant guilds » or small communities. A tall perennial can provide shade for a mid-size plant, which in turn is surrounded by a living groundcover that chokes out any remaining weeds. For example, once established, studies from BBC Gardeners’ World Magazine indicate that creeping thyme can take around three years to form dense cushions that effectively suppress weeds on their own. This creates a multi-layered, self-sufficient ecosystem. Your maintenance then transforms into a mindful, 30-minute weekly walkabout: one week for deadheading, the next for checking edges, and the others for simply observing and planning. This approach turns chores into a pleasant, focused activity.
Start applying these system-based principles to your own garden today to reclaim your time and create a landscape that thrives with minimal intervention.