Achieving a true indoor-outdoor connection is not about matching colours, but about designing a visual journey with plants that dissolves the boundary between your home and garden.
- Treat your patio as an extension of your interior architecture, using planters to guide sightlines and define space.
- Select plants for their long-term structural value and ability to create cohesive spatial rhythms, not just for a single season of colour.
Recommendation: Start by identifying the main visual axis from your living room through your patio doors and use it as the foundational line for your entire planting design.
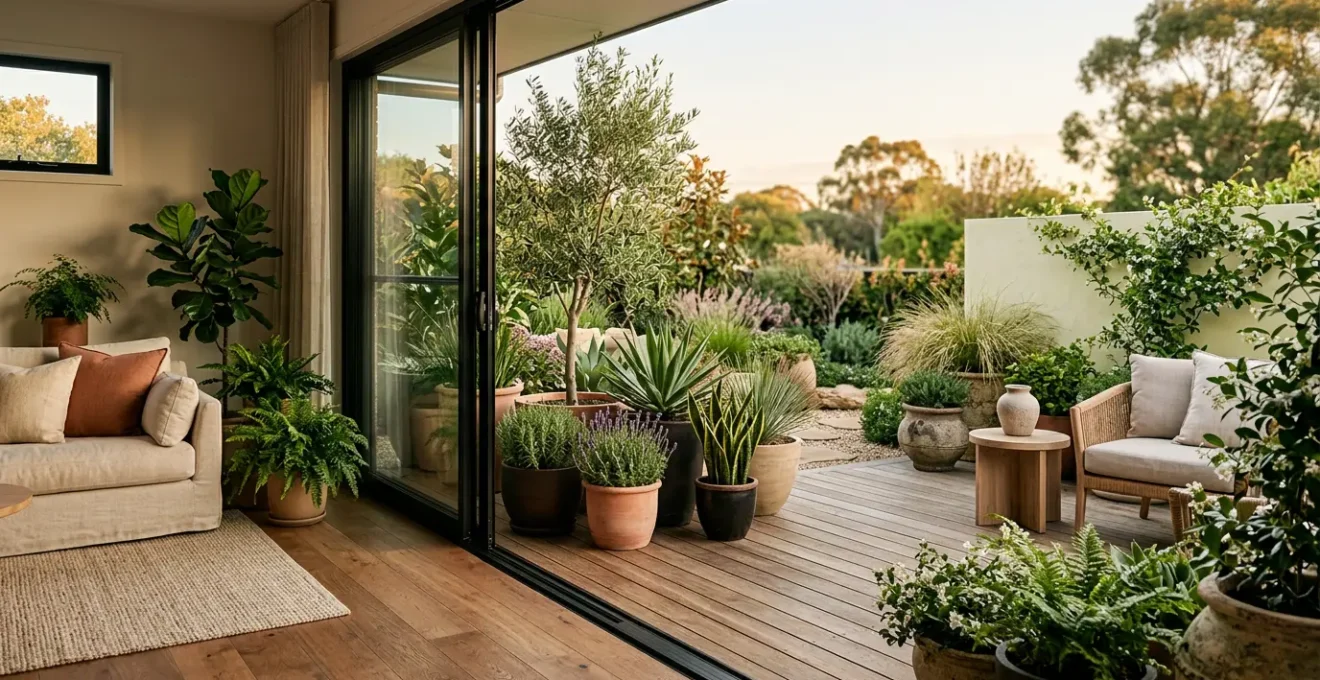
For homeowners with glass patio doors, the promise of a seamless transition to the outdoors often ends at the threshold. The living room feels like one world, the patio another. The common advice is to bridge this gap by matching cushion colours or buying identical pots—treating the symptom, not the cause. This approach reduces landscape design to mere decoration, a collection of objects placed near a door rather than a cohesive spatial experience. It overlooks the fundamental architectural relationship between the two spaces.
The real challenge isn’t a lack of matching decor; it’s a « visual break. » The eye stops at the door frame, perceiving a hard boundary. To truly extend your living space, you must think like a landscape architect. The goal is to erase that boundary, not by camouflaging it with matching colours, but by creating a powerful sense of visual and spatial continuity. It’s about orchestrating a flow that draws the eye—and the spirit—effortlessly from the sofa to the garden and back again.
But what if the key was not in what you match, but in how you direct movement and perception? The true art lies in using plants as an architectural tool. By strategically layering heights, textures, and forms, you can manipulate sightlines, establish a compelling spatial rhythm, and create a « visual journey » that makes the distinction between inside and out feel irrelevant. This is not about decorating a patio; it’s about completing the architecture of your home.
This guide will walk you through the core principles of designing with plants to achieve that seamless flow. We will explore how to position planters to define space without creating barriers, select plants for their architectural value, and combine them to create a lush, immersive environment that begins long before you step outside.
Summary: Designing a Patio for Indoor-Outdoor Flow
- Why Should Your Patio Flowers Match Your Living Room Rug?
- How to Position Planters Without Blocking Patio Access Routes?
- Geraniums or Hostas: Which Offers Better Value for Patio Pots?
- The Shade-Lover Error That Scorches Plants on South-Facing Patios
- How to Set Up Drip Irrigation for Patio Pots in One Weekend?
- How to Cluster Pots of Different Sizes for Visual Harmony?
- The Height Mistake That Makes Garden Paths Feel Claustrophobic
- How to Create a Potted Plant Jungle on a Concrete Terrace?
Why Should Your Patio Flowers Match Your Living Room Rug?
The question is a common one, but it frames the goal incorrectly. The objective is not to « match, » but to create a sophisticated echo. A truly seamless transition relies on creating a sense of familiarity and continuity that guides the eye outward. Instead of a literal colour copy, think of your interior as a design brief for your exterior. You are borrowing elements from the living room’s « scenery » to inform the patio’s design, making the two spaces speak the same visual language. This creates a psychological connection that dissolves the visual threshold of the door frame.
This principle of repetition extends beyond colour. As the Patio Productions Design Team advises in their guide, you should aim to repeat colors, materials, textures, and greenery. If your living room features warm wood tones, brushed metal, and soft wool textures, carry those motifs onto the patio. This could mean using terracotta pots that echo the warmth of the wood, zinc planters that reflect the metal finishes, and soft, feathery grasses that mirror the texture of a throw blanket. The connection becomes subconscious and elegant, rather than forced.
Echo interior palettes and finishes outdoors.
– Patio Productions Design Team, How to Seamlessly Transition Between Your Indoor & Outdoor Living Spaces
This strategy of continuity creates a powerful sense of cohesion, making the patio feel like a natural and intentional extension of the home’s interior architecture.
Case Study: The Lee Family’s Indoor-Outdoor Plant Continuity
To create a cohesive look between their living room and patio, the Lee family selected a mix of versatile plants, including ferns, succulents, and palms. Critically, they didn’t just place them outdoors. They used identical container styles in both areas, moving them between the spaces depending on the season. This created a literal and figurative bridge, enhancing the connection and making the entire area feel like one unified living space.
How to Position Planters Without Blocking Patio Access Routes?
The most common mistake in patio planting is treating it as an exercise in filling empty space. From a spatial design perspective, the « empty » space is the most critical element: it is your circulation path. An effective layout uses planters not as obstacles, but as tools to define and frame these paths. The key is to think in terms of « negative space, » the intentional, open areas that allow for comfortable movement and create a sense of uncluttered elegance. Your goal is to establish clear, generous routes from the patio door to other key zones like seating areas or garden access.
Instead of scattering pots randomly, group them into substantial clusters in corners or against walls. This technique, known as « anchoring, » creates pockets of lushness and visual weight while preserving broad, open channels for foot traffic. These open channels are not wasted space; they are the design. They ensure the patio feels expansive and functional, not cramped and chaotic. The planters act as soft architectural boundaries, guiding movement without creating hard barriers.

As the image above demonstrates, grouping containers into deliberate « pockets » leaves a primary axis of movement completely open. This creates a strong sense of order and flow. You can also use low-profile, curved arrangements of smaller pots to subtly guide the eye and body along a desired path, acting as psychological guardrails that feel natural rather than restrictive. The result is a space that is both rich with plant life and effortless to navigate.
Geraniums or Hostas: Which Offers Better Value for Patio Pots?
Comparing Geraniums (sun-loving annuals) to Hostas (shade-loving perennials) highlights a fundamental strategic choice. « Value » in this context isn’t about the initial price tag; it’s about a plant’s long-term contribution to your spatial design. An architectural approach to planting prioritizes structure, form, and year-round interest over fleeting seasonal colour. While annuals like geraniums provide a vibrant burst, their value is temporary. Perennials and evergreen shrubs offer a more sustainable design investment.
A successful patio composition is built on a foundation of structural plants. These are the hardy, often evergreen, specimens that provide a permanent framework. Think of boxwoods in formal containers, dwarf conifers, or broad-leafed evergreens like Fatsia japonica. They define the space’s volume and maintain its character through all four seasons. Annuals then become the « art » you hang on these permanent walls—seasonal accents that can be changed out without dismantling the entire structure.
When selecting your foundational plants, you must consider their ultimate size. A small, charming shrub can quickly become a space-devouring monster, disrupting the carefully planned circulation paths and sightlines. Always design for the plant’s mature form. By establishing a permanent structure with evergreens and hardy perennials, and then layering in seasonal colour, you create a design that is both resilient and dynamic.
Your Checklist: Assessing a Plant’s True Architectural Value
- Structural Foundation: Choose hardier perennials or evergreens as your permanent framework. Be realistic about maintenance needs like deadheading or trimming.
- Mature Scale: Research the plant’s ultimate size at full growth to ensure it won’t overwhelm the patio or block pathways in the future.
- Design Continuity: Plant some of the same perennials from your garden beds into patio pots to create a seamless visual transition and bring colour and texture up close.
- Formal Elements: For a classic, defined setting, use evergreens like boxwoods in containers to act as permanent, year-round structural anchors.
- Propagation Potential: Consider plants that can be easily divided or propagated from cuttings. This allows you to expand your design over time without additional expense, amplifying their long-term value.
The Shade-Lover Error That Scorches Plants on South-Facing Patios
A south-facing patio is a challenging environment. It’s often a heat island, with intense sun reflecting off paving and walls, creating conditions far harsher than a garden bed just a few feet away. Placing a shade-loving plant like a hosta or fern here, even in a pot, is a recipe for scorched leaves and failure. However, this doesn’t mean you are limited to only cacti and succulents. The architectural solution is not to surrender to the heat, but to engineer microclimates.
A microclimate is a small area where the climate differs from the surrounding zone. By strategically placing larger, sun-tolerant plants, structures, or even water features, you can create pockets of shade, humidity, and shelter for more delicate species. This is the essence of volumetric planting: using plants to shape the environment itself. A single large, drought-tolerant tree in a substantial container can cast enough shade to create a hospitable zone for an underplanting of medium-sized shrubs, which in turn protect low-growing groundcovers.
This technique, known as canopy layering, is how natural forests thrive. The tallest trees create the overstory, sheltering the understory shrubs and forest floor. You can replicate this on your patio. By thinking in layers, you can build a resilient, multi-dimensional ecosystem where plants support each other, creating a more humid and temperate microclimate for the entire grouping. This allows for a much richer and more diverse planting palette, even in the most challenging sun-drenched locations.
- Start with an Overstory: Add shade with a single, well-placed, drought-tolerant tree in a large pot, such as a Palo Verde, Mesquite, or a small olive tree. This is your primary shade creator.
- Create Canopy Layering: Beneath the tree’s canopy, position medium-sized shrubs that appreciate partial shade. They will benefit from the filtered light and, in turn, protect the soil and roots of even smaller plants.
- Use Companion Planting: Pair sun-loving « pioneer » plants at the edge of the cluster with understory plants tucked behind them, creating tiny pockets of shade.
- Install Thermal Mass: Place clusters near stone or brick walls. These materials absorb heat during the day and release it slowly at night, buffering temperature swings and providing warmth during cooler months.
- Group for Humidity: Densely grouping several low-water-use plants cools the immediate area through transpiration, creating a more comfortable microclimate for both the plants and you.
How to Set Up Drip Irrigation for Patio Pots in One Weekend?
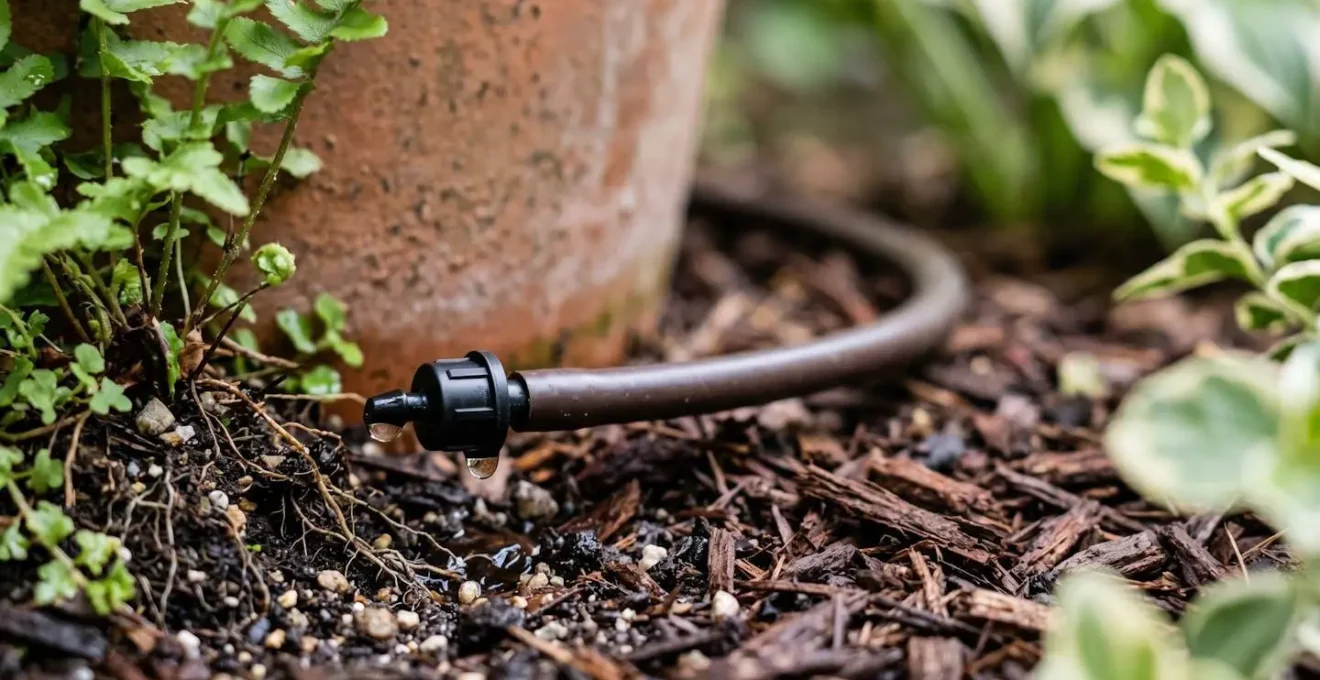
A visionary design is only successful if it’s sustainable. For a dense container garden, especially on a hot patio, manual watering can become an overwhelming chore. A drip irrigation system is not a luxury; it’s a crucial piece of infrastructure that ensures the health and longevity of your design. The key from a design perspective is to make this system completely invisible, so it supports the aesthetic without detracting from it. This is achievable in a single weekend.
The principle of an elegant setup is discretion. The main 1/2-inch tubing, which acts as the artery of your system, should be laid out *behind* your planned container clusters. When viewed from your living room or primary seating area, the hardware should be entirely hidden by the pots themselves. From this main line, you can run smaller 1/4-inch micro-tubing into each individual container. Using dark brown or black tubing helps it disappear against soil and mulch.
Adding a programmable hose timer elevates the system from a simple tool to an integrated part of your indoor-outdoor lifestyle. It automates the entire process, ensuring your plants receive consistent moisture even when you are away. This allows you to manage the health of your outdoor « room » with the same ease as adjusting your indoor thermostat, truly linking the management of both spaces.
Your Plan: Weekend Drip Irrigation for Container Gardens
- Connect the Head Assembly: Attach a 4-in-1 adapter to your faucet. This crucial component typically includes the required pressure reducer (drip systems need 20-40 psi), a filter, and a backflow preventer.
- Lay the Main Line: Run the 1/2-inch main tubing along the wall or edge of the patio, ensuring it is hidden behind where your pot clusters will be positioned.
- Branch with Micro-Tubing: Punch holes in the main line and run 1/4-inch micro-tubing to each pot or small cluster of pots.
- Create Dripper Rings: For larger pots, use 1/4-inch barbed tees and emitter tubing (with pre-installed emitters) to form a ring around the plant’s base, ensuring even water distribution.
- Close the System: Securely close the end of the 1/2-inch main line using a Figure 8 clamp or an end cap to maintain water pressure.
- Automate with a Timer: Install a programmable hose timer at the faucet. This is the final step that connects your outdoor space management to indoor comfort and convenience.
How to Cluster Pots of Different Sizes for Visual Harmony?
A collection of individual pots often looks like a random assortment. A curated cluster, however, reads as a single, powerful design statement. Achieving this harmony is a matter of applying classic artistic composition principles. The goal is to create a group that feels balanced, dynamic, and natural, not rigidly symmetrical. This is where you build the spatial rhythm that draws the eye from inside to out.
The most effective rule for grouping is to work with odd numbers—three, five, or seven pots. This creates a more organic and less formal feel than even-numbered groups. Within your group of three, for example, you should create an asymmetrical triangle with the tallest points of the main pots. This dynamic structure is inherently more interesting to the eye than a simple lineup. As noted by experts, variation is key. According to Garden Design Magazine, a successful display uses different heights to build visual interest.
A successful container display uses varying heights to create visual interest. Try a tiered plant stand, stacked pots, or even bricks hidden behind larger containers to raise others to eye level.
– Garden Design Magazine, Container Garden Ideas & Expert Tips
While creating contrast in height and form (pairing a tall, narrow pot with a low, wide one), you must also establish a unifying element. This could be a shared material (all terracotta), a common finish (all matte black), or a single, repeated colour that ties the disparate shapes together. Finally, position the cluster so the pots overlap slightly when viewed from your main indoor vantage point, like the sofa. This creates layers and a sense of depth, transforming a collection of objects into a single, cohesive sculptural element.
- Contrast Forms: When grouping containers, pair contrasting forms to make them complementary neighbours. A tall, slender pot is enhanced by a low, rounded one next to it.
- Use the Triangle Rule: Arrange three main pots so their tallest points form an asymmetrical triangle. This creates a dynamic composition that feels natural.
- Find a Unifying Thread: Ensure all pots in a single cluster share one common element—be it material (e.g., all terracotta), finish (e.g., all glazed), or a single colour family.
- Group in Odd Numbers: For a more organic and visually appealing arrangement, group pots in odd numbers like 3, 5, or 7.
- Create Overlapping Layers: Position the cluster so that from your main indoor viewpoint, the pots overlap slightly. This creates a sense of depth and prevents the arrangement from looking flat.
The Height Mistake That Makes Garden Paths Feel Claustrophobic
A common error in placing tall planters along a path or patio edge is creating a solid, uniform wall of foliage. While intended to define the space, this approach can inadvertently create a « tunnel effect, » making the area feel narrow and claustrophobic. It blocks sightlines and disconnects the patio from the wider garden, undermining the goal of an open, flowing space. The solution is not to avoid height, but to use it strategically to create « visual windows. »
Instead of a continuous hedge of pots, you should vary the heights and spacing of your containers to frame views rather than block them. Think of your planters as a series of pillars, not a solid wall. By alternating between tall, slender plants and lower, bushier ones, you create a visual rhythm of solid and void. These « voids » or gaps become the visual windows, maintaining a connection to the space beyond and preserving an open, airy feeling.
This technique allows you to define a path or seating area clearly while still allowing the eye to travel through and beyond the immediate space. It’s a sophisticated way to structure a layout without sacrificing the sense of expanse.
Expert Insight: The ‘Visual Windows’ Strategy for Path Planting
As detailed in Fine Gardening, a straight path lined with containers can become a beautiful allée. However, the success of this feature depends on maintaining openness. Experts advise that the key is creating visual rhythm through repetition while preserving sightlines. By strategically placing pots to create these ‘visual windows’ instead of solid barriers, designers prevent the tunnel effect and maintain a feeling of spaciousness. The path is defined, yet the connection to the larger landscape remains intact.
Key Takeaways
- True indoor-outdoor flow is an architectural concept achieved by guiding sightlines, not just by matching colours.
- Use plants as structural elements to define circulation paths and create « visual windows, » treating negative space as a key design feature.
- Build a resilient design with a foundation of perennial and evergreen plants, using annuals for seasonal accents rather than the main structure.
How to Create a Potted Plant Jungle on a Concrete Terrace?
Transforming a sterile concrete terrace into a lush, immersive jungle is the ultimate expression of volumetric planting. It requires combining all the principles we’ve discussed: layering, clustering, and using plants to shape the environment itself. The goal is to move beyond individual pots and create a cohesive, multi-layered canopy that envelops the space, softens the hard edges of the concrete, and creates a powerful sense of enclosure and escape.
The key is to think in three distinct vertical layers, just like a real jungle:
1. The Canopy Layer: This is formed by your tallest plants. Use tree-form specimens like a Fiddle Leaf Fig, a small Olive Tree, or tall bamboo in large, heavy containers to create an overhead ceiling. This layer provides dappled light and a sense of enclosure.
2. The Mid-Layer: This is the heart of your jungle, filled with dense, bushy, tropical-looking plants like Philodendrons, Alocasias, and large ferns. Clustered tightly, they provide the volume and mass that make the space feel full and lush.
3. The Ground-Cover Layer: Use trailing plants like String of Pearls, Creeping Jenny, or sweet potato vine at the front of your clusters. Allow them to spill over the edges of the pots to soften the lines and hide the concrete floor, connecting the planters to the ground plane.
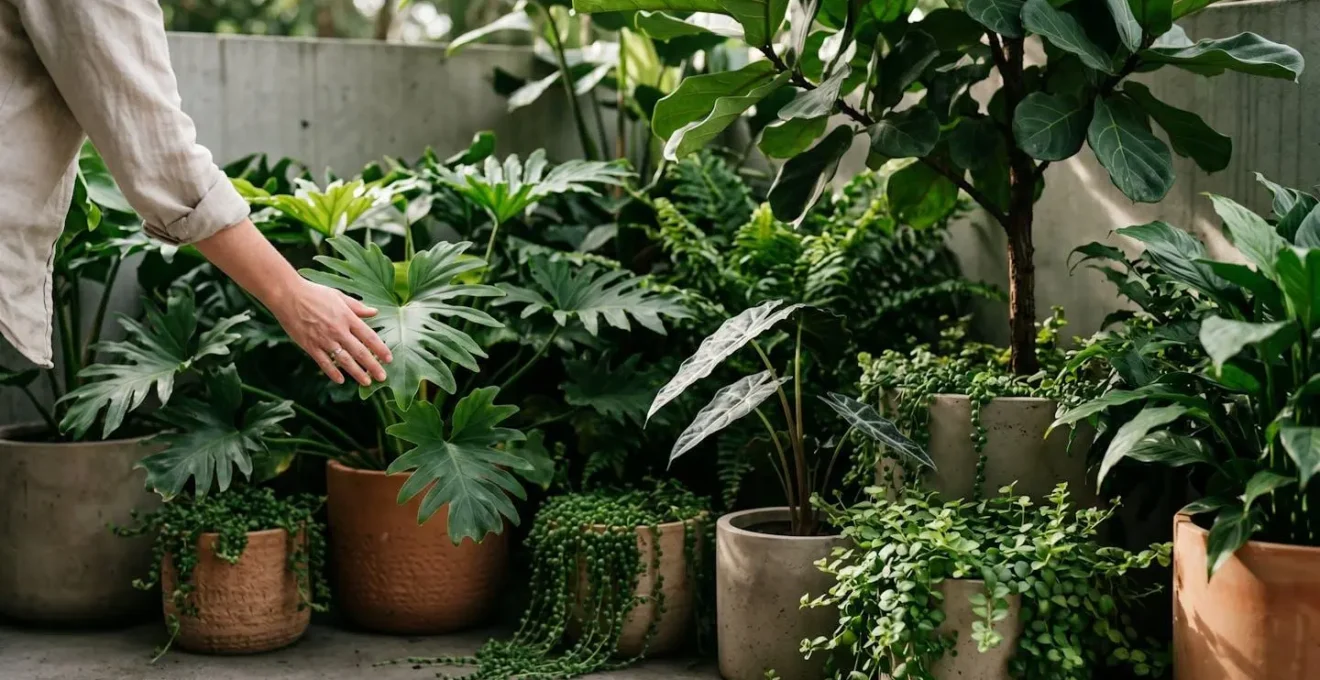
By composing these three layers together in dense, overlapping clusters, you create a rich tapestry of textures and forms. The space is no longer a flat surface with pots on it; it becomes a three-dimensional experience. As the team at Architropics notes, the benefits of this approach are profound, impacting your experience of the home itself. This layered, living environment becomes the final, vital room of your house—a space that is truly alive.
Begin today to see your patio not as an afterthought, but as an unwritten room. By applying these principles of spatial design, you can craft a seamless, living extension of your home that invites you to move effortlessly between the comfort of the indoors and the vitality of the outdoors.